Abstract
The artifact configuration describes the structure of the artifacts you want to sign. For simple artifacts, you can use predefined configurations to get started quickly. For signing several artifacts together, and for more complex artifacts, specify the structure of your artifact and provide signing directives using XML.
Creating and editing artifact configurations
Upload an artifact sample
Before you start creating an artifact configuration from scratch, we recommend that you upload an artifact sample first. SignPath will then analyze your sample and look for nested artifacts that can be signed.
For non-trivial artifacts, you may want to edit the resulting artifact configuration:
- It may contain signing instructions for files that you do not want to sign, such as third-party components.
- It may contain fixed strings, such as version numbers, that you want to replace with wildcards.
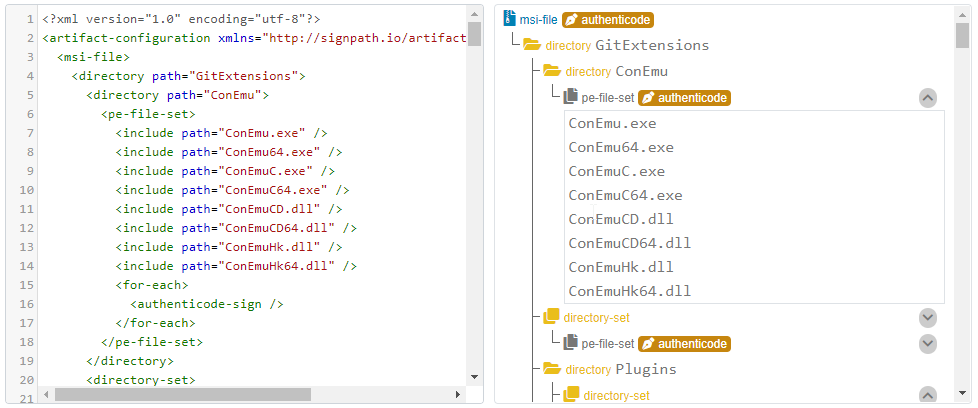
- It may have very similar sections that you want to unify using
<directory>elements and wildcards (example).
Create an artifact configuration
When you create a new project, a default artifact configuration will be added. To create additional artifact configurations, select the project and click Add in the Artifact Configurations section.
Choose one of the following options from the drop-down list:
- Upload an artifact sample: select an artifact file to have the artifact configuration generated.
- Any template: start with a single file type and customize it according to your needs.
- Check Sign nested files to sign files contained within that file (available for composite file types).
- Check Sign multiple files to sign more than one file of the selected type.
- Custom: create an artifact configuration from scratch using XML.
You can customize generated or selected artifact configurations in many ways, e.g.
- add arbitrary file structures
- add metadata constraints for additional security
- add verification of existing signatures for upstream and 3rd-party components
- add user-defined parameters
For uploaded sample artifacts, you need to manually review the resulting artifact configuration:
- Exclude all 3rd party components that you don’t want to be signed with your certificate. Consider verifying existing signatures for these components.
- Consider adding metadata constraints where available for additional security.
- Replace version numbers that are subject to change with wildcards or user-defined parameters.
- Consider replacing lists of named files with wildcards.
Edit an artifact configuration
To modify an existing artifact configuration, select a project, then select the artifact configuration you want to change, and then either
- select Edit to select pre-defined artifact configurations or edit the XML content
- select Update from an artifact sample to generate your artifact configuration from a sample file
When you edit XML content in place, a graphical representation will be rendered immediately. If you prefer to use code completion, select Download XML schema and use a schema-aware XML editor, such as Microsoft Visual Studio.
Read more about projects and artifact configurations in Setting up Projects.
Signing multiple files
You can easily sign multiple files by creating a ZIP archive. Use wildcards, individual file declarations or file sets to define structure and signing directives.
Deep signing of nested files
Sometimes you need to sign both a composite file and its contents. For instance, an MSI installer package needs to be signed, but you also want the files it installs to be signed. SignPath can sign both the composite file and its contents in a single pass if you specify an appropriate artifact configuration. See here for an example.
Further reading
- Syntax and Structure: Introduction and general syntax
- Reference: Supported file types and signing methods
- Attestations: Creating and signing buiild attestations
- Examples: Examples for various elements and combinations